A broken pipe can be a homeowner’s nightmare. A damaged pipe, whether it is a minor leak or a huge burst, can seriously harm your house and necessitate expensive repairs. In addition to destroying furniture, walls, and floors, water damage can also foster the growth of mold and mildew.
As a result, it’s critical to take rapid action and fix a broken pipe as soon as feasible. Finding the cause of a leak is the first step in fixing a broken pipe. You can switch off the water supply and listen to the sound of running water to find the leak if it cannot be seen.
The next step is to turn off the water supply to the affected area once you have discovered the leak’s source. The next step is to use a hacksaw or pipe cutter to remove the damaged portion of the pipe. You must install a new piece of pipe after removing the damaged segment. A coupler or compression fitting can be used for this.
These fittings are simple to install and are often found in hardware stores. The water supply must then be turned back on, and the repaired pipe must be checked for leaks. You can switch on the faucets and check the water pressure to make sure everything is functioning properly and if there are no leaks.
Although mending a damaged pipe may appear difficult, it is a doable chore that can prevent more expensive repairs down the road. The procedures described in this blog post can help you quickly and effectively fix a damaged pipe. Keep in mind to exercise the required caution, and it is always preferable to seek advice from a qualified plumber if you have any questions.
Fortunately, it’s not as difficult as it might appear to fix a damaged pipe. You can fix a broken pipe in a matter of hours if you have some basic plumbing knowledge and the appropriate tools.
Step-By-Step Tutorial to Fix a Damaged Pipe
1. Turn Off The Water Supply
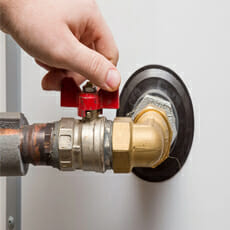
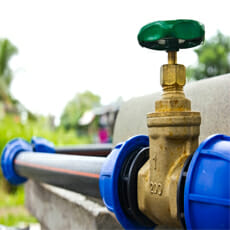 The first and most important step in repairing a broken pipe is shutting off the water supply. This is because water keeps flowing through the broken pipe, potentially leading to more damage and flooding. The main water shut-off valve needs to be found and turned off right away.
In other circumstances, turning off the valve can need a special instrument or may be impossible to access. To stop further harm to your home or property, it is crucial to take the essential actions to shut off the water supply as soon as possible.
Also read: How Water Flows Through Your House?
2. Identify The Leak’s Location
Finding the source of a leak is an essential first step in mending a damaged pipe. It is hard to assess the severity of the damage and the most effective line of action for repair without knowing where the leak is. Numerous things, including corrosion, pipe damage, or high pressure, can result in leaks.
You might need to visually investigate the area, listen for the sound of leaking or rushing water, or utilize specialized instruments like leak-detecting equipment in order to locate the leak. You can then move forward with the necessary repairs to fix the broken pipe once the leak’s exact location has been determined.
Here are 4 methods for determining the origin of a leak:
- Investigate For Corrosion – Leaks in pipes are frequently caused by corrosion. Due to exposure to water, chemicals, or other substances over time, pipes may corrode. Examine the pipes for any indications of rust or discoloration as they could point to deterioration and eventually result in a leak.
- Search For Indications of Water Damage – A leak may be indicated by water damage. Look for water stains on the floors, walls, or ceilings as well as any signs of mold or mildew development. These symptoms might point to a leak that has damaged property but is undetected.
- Check the Water Pressure – High water pressure may lead to rupture or leak in the pipes. Using a pressure gauge, check the water pressure; if it is more than 80 PSI, a leak may be the result.
- Check the Joints – Joints where two pipes connect frequently experience leaks. Examine the connections for any damage or cracks, and look for moisture or water stains at the joints.
You can take precautionary action to ensure that a leak doesn’t happen again by determining its root cause. For instance, if corrosion is the root of the leak, future damage can be avoided by replacing the damaged pipe with one made of a non-corrosive material.
Installing a pressure regulator can assist manage the pressure and stop future leaks if the water pressure is too high. Finding the source of a leak can also assist you in deciding whether you require a plumber’s assistance in order to ensure a quality repair.
3. Drain The Water
 Draining the water is an essential part of repairing a broken pipe since it facilitates the repair process and helps to avoid more water damage. It is crucial to turn off the water supply to the affected area and open all the taps and faucets to drain any remaining water from the pipes before attempting to mend the broken pipe.
Additionally, this aids in releasing any internal pressure in the pipes, making maintenance on them safer.
The repair process may be more challenging and the surrounding areas may sustain harm if the water is not adequately drained. Draining the water is therefore a crucial step that shouldn’t be skipped.
4. Prepare The Area
An essential first step in repairing a broken pipe is to prepare the area. This entails drying the area to avoid any water damage and making sure the region around the pipe is free of any obstructions or debris. To avoid mishaps or harm to the equipment, it’s also crucial to turn off any nearby electrical appliances.
Making the area ready makes working on the pipe easier and lowers the possibility of future damage or accidents. Additionally, it ensures that the repair is carried out correctly and efficiently, providing a long-lasting fix for the damaged pipe.
5. Turn the water heater off
 Turning off the water heater is one of the most basic but vital actions that many people seem to miss. This is due to the possibility that a broken pipe may result in water leakage, which could potentially cause harm by flooding the area around the water heater.
The heating element in a flooded water heater may suffer damage or possibly a short circuit, which could result in a fire.
Additionally, if the water heater is leaking, it may still be heating the water, which could result in steam being produced as the water boils. The risk of fire and other dangers is decreased by turning off the water heater in addition to preventing damage to the heater itself.
If you need a local professional plumber who can help you install your hot water system. See these links below:
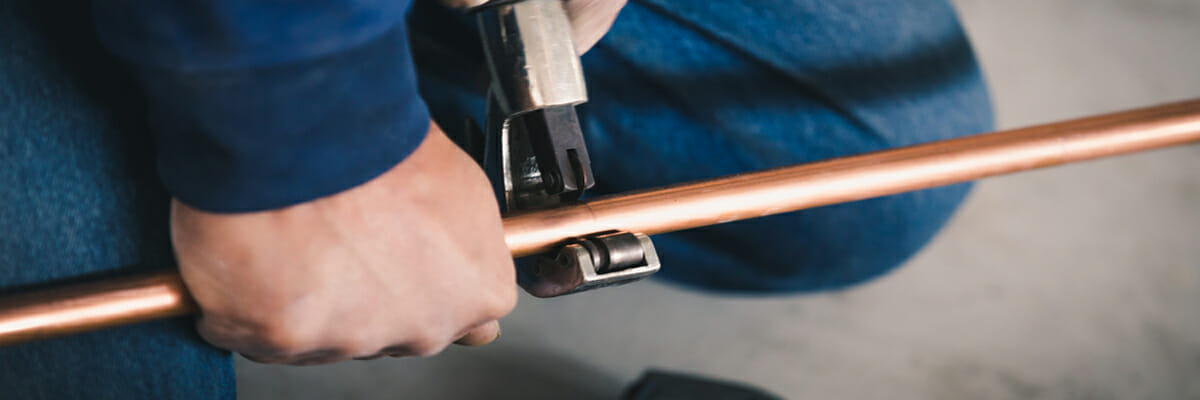
6. Cut Out The Damaged Section
A critical part of fixing a broken pipe is removing the damaged portion of it. To do this, cut the broken pipe portion out using a pipe cutter to leave a clean edge for the replacement pipe to go into. It’s crucial to gauge the length of the pipe portion that needs to be removed in order to correctly cut the new pipe.
To ensure a suitable fit for the replacement pipe after the damaged part has been removed, the remaining pipes should be cleaned with a wire brush. You can guarantee a safe and long-lasting fix for the broken pipe by chopping out the damaged area and inserting a new piece.
7. Clean The Area
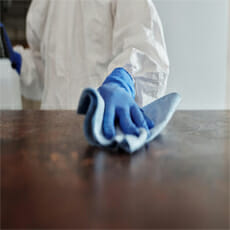 Cleaning the region is an important first step in pipe repair. Around the damaged area, dirt, debris, and rust can gather, making it challenging to properly cut and fit a new pipe.
Remove any obstacles and give the area a thorough cleaning with a wire brush before beginning any repairs. In order for the new pipe to fit correctly and securely, a clean surface will be required.
Cleaning the area can also help stop future leaks and damage by eliminating any mineral or rust buildup that might lead to further corrosion. To successfully repair a damaged pipe, cleaning the area is a crucial first step.
8. Measure The Replacement Pipe
When repairing a broken pipe, measuring the replacement pipe is an important step. The replacement pipe needs to be the right length, as any variation could cause leaks or other problems. It is crucial to collect the exact dimensions of the damaged section that was removed before cutting the new pipe.
The replacement pipe may be precisely cut to fit after you know the specs. When you solder the joint, this will help to ensure a tight, secure seal. The replacement pipe can be skipped or measured incorrectly, which can lead to a subpar repair and potential future problems.
9. Sand The Edges
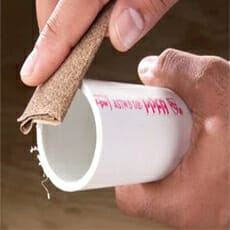 When repairing a broken pipe, it’s crucial to sand the pipe’s edges. It is simpler to install a new pipe and assures a tight, secure fit if the pipe’s edges are sanded. Sanding also aids in removing any debris or rough patches on the pipe’s edges that may otherwise result in leaks or weak points in the connection.
A robust, waterproof seal can only be made on a surface that is level and smooth. Skipping this step or not sufficiently sanding the edges might lead to a bad joint and subsequent leakage. Therefore, it’s crucial to spend enough time sanding the replacement pipe’s edges appropriately.
10. Apply Flux
Chemical component flux is necessary for fixing a burst pipe. It is essential because it aids in forming a solid connection between the new and old pipes. Before the new pipe is installed, flux is added to the pipe’s edges. Cleaning the pipes and getting rid of any oxidation or contaminants that can hinder the formation of a firm bond is helpful.
Flux also aids in the fair distribution of heat during the soldering procedure. This is essential because it guarantees the joint’s durability and water resistance. Without flux, the repair might not hold up over time, leading to more pipe damage.
11. Fit The Replacement Pipe
A broken pipe must be repaired by fitting the replacement pipe. To do this, a new piece of pipe must be cut to the right length, its edges must be smoothed out to make it easier to fit, flux must be applied to the edges of the new pipe as well as the existing pipe, and the new pipe must then be slid into position.
To establish a correct fit, which is necessary for producing a powerful, waterproof seal, this step calls for accuracy and close attention to detail. The new pipe can be soldered to produce a long-lasting seal after it has been fitted. Future leaks and harm to your plumbing system can be avoided with the help of a replacement pipe that has been placed properly.
Also Read: Pipe Replacement vs Pipe Relining
12. Solder The Joint
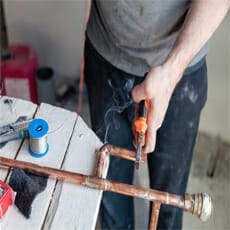 The joint must be soldered in order to produce a strong, watertight seal that will stop further leaks. This is an essential step in repairing a broken pipe. You will need a blowtorch and solder to solder the junction.
To help the solder stick to the metal, first, add a little amount of flux to the margins of the new pipe and the other pipes. The solder should then melt and flow into the space between the pipes after being heated with the blowtorch.
By doing so, a solid bond is formed that can withstand the force of the water flowing through the pipes. To make sure the seal is solid after soldering, let the junction cool completely before turning the water back on.
13. Allow To Cool
It’s essential to let the junction fully cool after soldering if you want to repair a broken pipe. This is because trying to turn on the water too soon can weaken or possibly cause the connection to split apart because the junction can get quite hot during the soldering process.
The joint will form a solid, waterproof seal if you let the joint naturally cool. This will guarantee that the solder sets properly. It’s vital to take your time and avoid rushing this process because doing so could severely damage the pipe and necessitate more expensive repairs.
14. Test The Pipe
An essential part of repairing a broken pipe is testing the pipe. It’s crucial to turn the water back on after fixing the pipe in order to look for leaks or drips. If there are any leaks, they need to be fixed right away to stop future harm to the neighborhood. Turn on all the faucets and valves in the affected region to test the pipe, and then look for any evidence of water leaking.
For several minutes, let the water run to see how well the repair holds up under pressure. If everything seems to be operating as it should, insulate the pipe to guard against further harm and guarantee that the repair will last for many years.
15. Insulate The Pipe
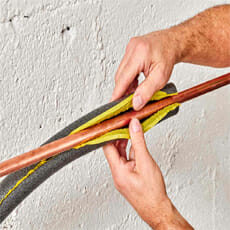 To repair a broken pipe and avoid further damage, the pipe must be properly insulated. After the pipe has been fixed, it is crucial to insulate it to shield it from severe temperatures and keep it from freezing during the winter. Additionally, insulation works to lessen heat loss from hot water pipes, which can minimize your energy costs.
Insulation can also stop condensation from collecting on cold pipes, which helps protect walls and floors from moisture damage. It’s critical to select the appropriate insulation material for your pipes among the variety of options available, including foam and fiberglass.
The lifespan of your pipes can be increased, expensive repairs can be avoided, and your home’s energy efficiency can be increased.
Conclusion
In conclusion, if a damaged pipe isn’t addressed right away, it could seriously harm your home. If you see any indications of a broken pipe, including poor water pressure, water stains on walls or ceilings, or strange noises originating from your pipes, you must take immediate action.
Ignoring these red flags may lead to more serious damage and more costly repairs. To guarantee the repair is successful and the pipe is shielded from further damage, soldering the connection, checking the pipe, and insulating the pipe are all essential processes.
Overall, repairing a damaged pipe might be a difficult task, but it is doable with the correct equipment and experience. However, it is always preferable to seek professional assistance from a qualified plumber to ensure a safe and efficient repair if you are unclear about any step in the repair procedure or if the damage is substantial.
You can call Damien McEvoy Plumbing for any pipe replacement or repair services at (02) 8599 4593.
 Enquire